
Technology
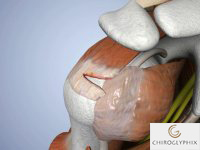
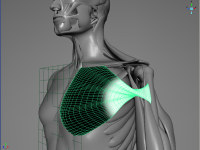
How would you like to put the resources of a Hollywood design studio behind your practice? With Chiroglyphix you aren't that far away. Chiroglyphix was written in .NET with a Microsoft SQL database. The 3D animations are created in Maya. The animations are created using the same technology that produced many of the special effects in recent Hollywood blockbusters such as: Spider-Man, Star Wars, Episode II: Attack of the Clones, The Lord of the Rings: The Two Towers, The Lord of the Rings: The Fellowship of the Ring, Gladiator, The Matrix, The Matrix Reloaded, The Hulk, and Terminator 3: Rise of the Machines. Chiroglyphix may not have the big name actors of these movies, but then again you wouldn't want to pay the price we would need to charge if we did! The software comes with 140 animations with more being produced each year. The level of complexity and attention to detail needed to make each animation is truly remarkable. The quality put into each image directly translates to the heightened reputation your clinic will have in using it. The human models and textures were created based on the measurements and study of actual bodies at the University of Utah.
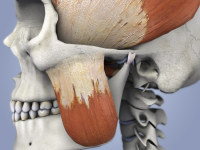
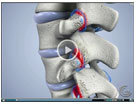
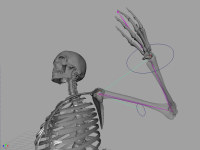
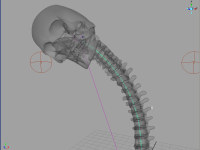
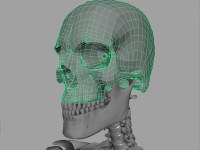
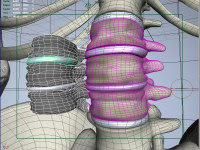
To begin the animation process, a storyboard is developed to define what assets are going to be required in the animation. After the assets have been defined, the modeling begins in 3D. Using polygons, typically 4-sided, and manipulating their vertexes, edges, and faces, the mesh or shell of the object is created. Once completed, you will have a virtual model of the object. The mesh itself is hollow and only consists of the geometry that was put into it during modeling. The mesh itself has no color, and the texture maps must be created. The polygons of the mesh have a UV coordinate assigned to each vertex. Those UVs are laid out in 2D so the texture maps may be put on the mesh based on the UV coordinates. The texture maps are placed into a shader hierarchy which defines the overall coloring of the mesh, from secularity and reflectivity, to translucency and glow. Once the mesh is completed and the textures are done, you have to rig the mesh to allow movement and deformation. There are many ways of doing this, but each vertex must be told how it is to move based on the rigging used. After that is completed, you must create the animation by setting key frames on the timeline telling the rig where it needs to be and how it needs to move between each of the key frames. Then you have to light your scene using virtual lights, and set up your virtual camera so that the computer knows how to light the object and where to render the scene from. Each of the frames in the animation (consisting of 30 frames per second) is then rendered by the computer and saved into an image file. The final step is to take the rendered images and composite them together into a final animation, adding post effects to the animation where needed.

Useful Links: